
Hey guys!
Finalmente he terminado mi hangar para Battletech. No hice fotos del proceso pero voy explicar como se hace para la gente que esté interesada. Es bastante sencillo y barato la verdad y la luz queda genial. No voy a explicar el proceso de pintado ya que eso va al gusto del que lo haga y depende del tipo de tablero que uses, el ejército al que pertenezca etc.
At last I finished my Battletech hangar. I didn't take WIP pictures but I will explain how I did it for curious people. It's quite simple and cheap to be honest and the light looks great. I won't explain how to paint it since that's depending on the maker, the army, the table etc
Materiales / Materials:
- Cartón / cardboard
- Poliestireno o porexpán / insulating foam or porexpan
- Goma Eva / foamy
- Pintura, rocas, gravilla y césped / Paint, rocks, gravel and artificial grass
- Containers de papel / paper containers
- Malla de plástico fina o de metal / fine plastic or metal mesh
- Presillas / Zip-ties
- Una base "Mecha Hangar" de Kotobukiya / One "Mecha Hanger" base from Kotobukiya
- Estireno / styrene
- Una luz barata de armario led / a cheapo led light
El interior / The interior:
 |
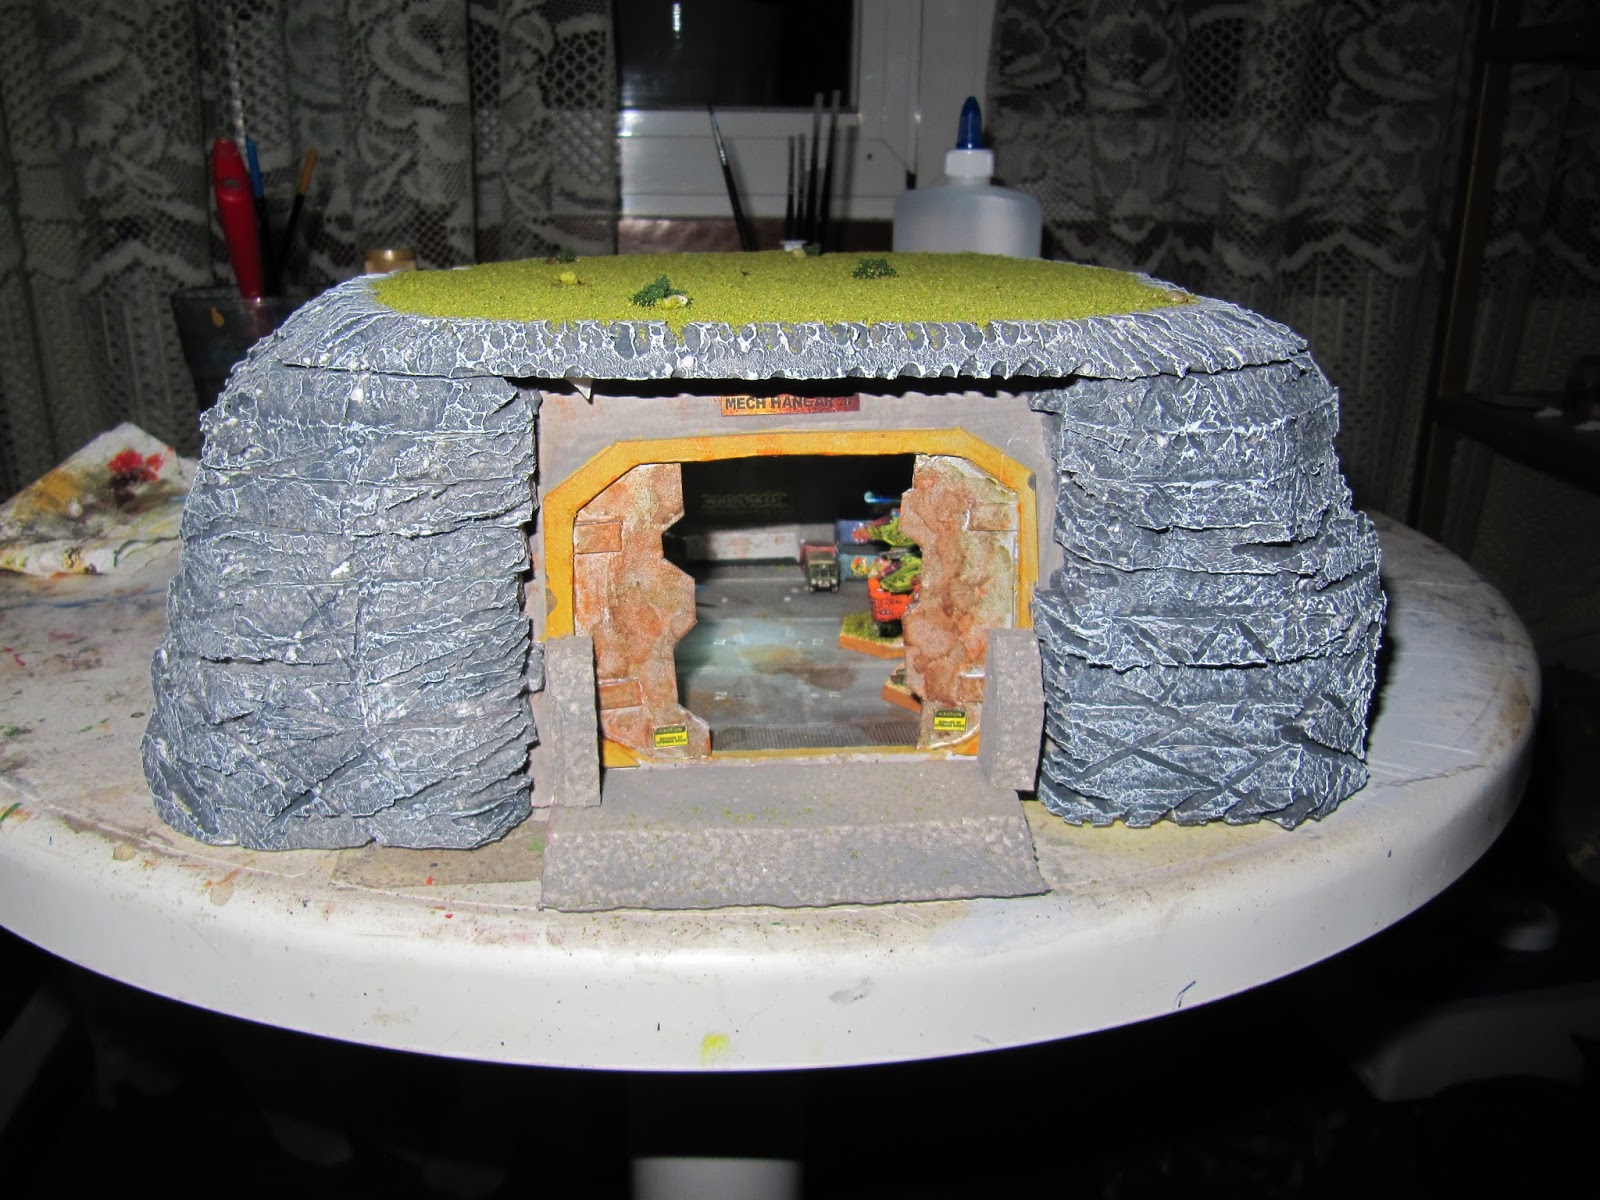
The hangar ground is the Kotobukiya base. They are usually around 10$ on the internet but sadly they're hard to find nowdays since they're discontinued. If you can't find them you can use poster board or one centimeter porexpan and make textures with cardboard. If you use the base sand down the sides so the walls can be glued correctly.
Las paredes son de cartón pluma aunque podéis hacerlo con cartón normal. Miden 15cm (como el largo de la base) y de alto 11cm (uno extra para el alto de la base). Una vez estén hechas las cuatro marcad cual es cual y empezad a decorarlas. Lo primero que hice fue el fondo, puse un ventanal, una entrada general de vehículos y una rampa a una entrada auxiliar. Todo hecho con cartón y goma eva. Haced un borde por todas las paredes del hangar de unos 5mm de alto (yo lo pinté amarillo para que destaque).
The walls are poster board although you can use normal cardboard. They're 15cmm (like the length of the base) long by 11cm high (an extra centimeter for the height of the base). Once you did them mark each one by it's position on the base and start detailing. I did the end wall first, I did a big cristal observatory, a general vehicle entry and a auxiliary lateral entry with a ramp. Everything was done with cardboard and foamy. Make a border in all the hangar of about 5mm (and I painted it yellow so it looks better).

En los laterales use las presillas para hacer los carriles de los ascensores y el resto es cartón para detallar la zona. Usad referencias de videojuegos, películas o imágenes de internet como inspiración. Los ascensores son una placa de estireno con forma de elevador de 1.5mm. En el borde pegué la malla de plástico para hacer el raíl de seguridad. Para detallarlos les puse containers, cajas hechas con dados de 5mm y un par de soldados convertidos y pintados como si fueran mecánicos.
I've used zip-ties on the sides to make the elevator's rails and the rest of details is just cardboard. Look for references in videogames, movies or internet pics. The elevators are just a styrene base in elevator shape of 1.5mm high. On the lateral I glued a bit of the plastic mesh to make the railings. To detail them I added containers, boxes made with 5mm dice and two soldiers converted and painted as mechanics.

The frontal door was the hardest part: I searched for lots of reference pictures from big hangars and doors. I made a semi hegagonal cut on it to make the door.
Con goma eva hice las mitades de las puertas y las puse dentro de el agujero tras tapar los desperfectos con tapaporos. Luego simplemente hice los bordes para darle mas profundidad y algunas bisagras. También añadí diversas pegatinas por todo el hangar y en la puerta.
I made both halves of the door with foamy and glued them inside the cut after filling the gaps with filler. Then I simply made the exterior silhouette to give it depth, some rectangular shapes and some stickers both on it and the rest of the hangar.
Exterior / exterior:

Once you glue the walls to the hangar we start the exterior. The mountain is made with insulation foam layers from 1cm high foam. Copy the shape of the hangar on the foam and then make big shapes on the exterior but end it on the sides of the frontal door so you can access it.
Yo necesite doce capas ya que necesitamos una para el techo. Yo lo corté todo con un cortador de porexpan eléctrico para que no tirara bolitas por doquier. Pegué todas las capas salvo el techo a las paredes y comencé a cortar cachos y darle textura a toda la montaña. Esto os llevará tranquilamente un par de horas.
Entonces haremos la rampa frontal para el hangar. Yo simplemente hice una rampa con porexpan y dos pequeños pilares. También en este momento pegué pequeñas rocas por el costado de la montaña para que así cuando pintemos todo quede con el mismo tono y color.
Then I made the frontal ramp to the entrance. I've made a simple ramp with two pillars with foam. I also glued some small rocks on the sides of the mountain so when I painted it everything has the same coloring.
Techo / roof:

The roof is the last layer of foam. First put it in place and texturice it following the sides of the mountain. Then glue something as supports (I've used toothpicks) and paint where they fit. Then with the electric cutter make holes so they can fit somewhere and make sure it can close correctly. After that we just need to put some aluminium foil on the inside so the light works better.
La luz / The lighting:
La luz es un proceso muy simple: despegar el pegamento que suelen traer por detrás y colocadla lo mas al centro posible.
The ilumination is a very simple process: just glue it in the center of the roof on the inside.
Tras esto abridla y pintad los bordes con óxido para que no destaque demasiado. Colocad las pilas y encendedlo. La mía se puede encender desde fuera con la mano pero sino es tan simple como sacar el techo y encender.
After that open it and paint the sides with oxide so it looks correctly like the rest of the hanger. Then put the batteries and turn it on. Mine can be turned on from outside but if you can't with yours just open the top and turn it on.
Otros detalles y recomendaciones / Other details and recommendations:

I can't tell you much more. To be honest be as imaginative as you can when making it. The containers are made with paper; I searched for a base on the internet, changed the scale and added graffities.
También recomiendo hacer carteles con información genérica (o si es de una facción concreta publicidad) con el Photoshop. Yo hice un par de etiquetas con cosas aleatorias y poco mas.
I also recommend making warning sings and posters (or faction banners / ads if its for a specific faction) with Photoshop. I just did some tags with random things.
A la hora de pintar ya es otro cuento: si lo queréis limpio, oxidado como el mio, en colores de una facción, polvoriento...
Painting it is another matter entirely; if you want it clean, rusted like mine, in faction colors, dusty...
También recomiendo añadir cosas como mecánicos o vehículos para que de una mejor sensación de escala. Yo quería añadir un par de cosas mas como una elevadora, cajones de munición, un par de cabras por la montaña y árboles pero no tengo dinero ahora mismo para ello así que esos detalles irán con el tiempo.
You should also add mechanics or vehicles to give a better scale sensation. I wanted to add some more things like a forklift, some ammo pallets, a few sheep on the mountain and trees but I didn't have enough money for it now so those details will come in the future.
No me queda nada por decir, si tenéis dudas dejadme un comentario y os explicaré lo mejor posible la duda que tengáis. Lo mas importante es tener paciencia, constancia, imaginación, ganas y buscar muchas, muchas referencias. De verdad, lo agradeceréis muchísimo.
So that's it, if you have any questions just ask in the comments and I'll answer the best I can. The most important part is to be patient, constant, imaginative, have the will for it and look for lots of reference. Really, you will put it to good use.
Peace out!
No hay comentarios:
Publicar un comentario